Monday, September 30, 2013

FALL Banner

It's been difficult for me to keep up with all the things the internet has to offer theses day.  As creative artist, back in the day we all were so excited to have blogs, with other social media not really set up for creative interchanges.  Fast forward to today, when we have a gazillion blogs (wonderful blogs), Pinterest, Instagram, easily working Facebook, and more.  What's a girl to do? Spread herself thin or pick one and camp there?  Right, I think I spread myself as thin as the peanut butter on a PBJ sandwich (Mark always says I spread it too thin!) But it all works out in the end, I enjoy nibbles of all good things. 

Today I'll show a few photos of a "FALL" banner I made and then shared with our Ladies group at the church. I needed a fairly easy and fast project.  The minute I saw Nikki Grandy's FALL banner on Instagram I knew the banner would be a perfect project. (Do take some time to check out her blog; I *love* her style!


  {{This is her Instagram photo above.I can't figure out how link the Instagram photo.}}

I quickly made a mini FALL banner. 

It was cute and all, but just didn't give the *punch* that Nikki's gave.  So what was going to be a quick small project began to take on some time as I painted larger sized triangles.


I used thick cardboard, cutting the triangles with a utility knife.  I only painted one coat of chalkboard paint, as it's not really a useable chalkboard. Nikki had used burlap as the background, but I didn't have enough burlap for all the ladies so I replaced that with vintage sheet music.


Here's a photo from one of the ladies' home, after she put it up (the minute she got home that night!):


I did make two more later, using the burlap, for our daughters:


Here's the FALL banner I made for Melissa hung in her house over her vintage piano:


This was a very fun and easy project and I so appreciate Nikki's Instagram photo which was my inspiration.

What have you made this year for your FALL décor?

Blessing,
           ~Heidi

Saturday, August 24, 2013

You need pie! BLACKBERRY PIE!


The last few Saturdays of summer are some of my favorite days of the year.  Today was one such example.  After washing and detailing our vehicles I remembered today was our town's annual "Blackberry Arts Festival" and asked Mark if he wanted to take a walk through it.  Sure! So we jumped in the Jeep, which is perfect for a summer ride with the top off it right now. 


We walked around the festival noticing all the blackberry foods and even taste tested a few goodies: 
~blackberry fudge
~blackberry lemonade
~blackberry beef jerky
~blackberry pies, cobblers, and crisps
~blackberry jam
         And so much more!

            (Search Pinterest for Blackberries recipes here!)


Before we went back home we stopped on one of our country roads and picked some blackberries, as I really wanted to make a blackberry pie and some blackberry lemonade.  We picked the best tasting blackberries ever, while a couple of horses kept us company.


Then back home for the lemonade.  I made a pitcher of lemonade then added some blackberry puree  from the fresh blackberries. We ate some Summer Sausage (we bought at the festival), Colby Jack cheese and crackers, sipping on our iced blackberry-lemonade. 


 Then I moved on to my Baking Corner and made a blackberry pie.  I realized I haven't made a blackberry pie in a couple years.  Back when there were always kids around here I'd make SEVERAL a WEEK!  I'd tell the girls, just bring me four cups of picked blackberries and I promise to always make a pie for you.  I can whip up a pie and get it in the oven in less than 5 minutes.

 
And back out of the oven in 45 minutes....


When the pie was baking I painted a quick little sign, "You need pie!"


I could barely get the pie out of the oven before I just had to take a teaspoon and taste test my blackberry pie.  Perfect....Yummy.  "Mark, do you want to try a piece?"  "Best pie you've ever made!"  LOL We have fun here at Sweet Woodruff Acres.


It's time for dinner, but no one is hungry...

Enjoy these sweet summer days...
             Blessings, Heidi

Tuesday, July 30, 2013

White Chocolate Chips, Craisins and Mary Engelbreit


After a very busy weekend (visiting relatives) I finally got to our mailbox today to find a book.  I hadn't ordered a book recently (the last week or so!) and wondered what it was.  To my surprise it was Mary Engelbreit's newest cookbook, "120 Dessert Recipe Favorites: Mary Engelbreit's Fan Fare Cookbook". *


Whoot, whoot!  Two of my recipes are included in this cookbook.  When you send in a recipe and her company uses it, you receive a free cookbook.  I'm delighted to see my name in print, since I haven't written a book, yet, this sort of satisfies my "WRITE A BOOK" on my imaginary life bucket list.


If you can, do purchase this cookbook, some white chocolate chips and craisins, then make my recipes.  You'll thank me.
           
            Blessings,
                         ~Heidi
        
 
(*I just notice the release date is September 10, 2013.  You can preorder on Amazon.)


Wednesday, May 15, 2013

Shabby Chic White Painted Cedar Hope Chest Project & some Running Around

I hit the mother load on Mother's Day weekend!  Yes, Mark treated me like a Queen Mother!  I've had a list of "wish" items and he drove me around several towns for a few days and made it happen. I needed new running shoes badly, I think I've clocked almost 700 miles on my current pair. That's obviously very bad. 


I wear Saucony Ridge Trail, as I run on a gravel/dirt road.  I needed (wanted) a few things from Lowe's and at the top of my list was:


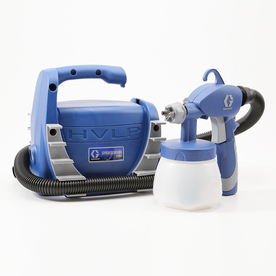
... the "Paint Sprayer", which every DIY girl needs! It's wonderful!  It's the Graco 2900 model, a good light weigh sprayer for small jobs, such as this cedar chest project I'll tell you about.


This before photo was taken in the garage of the lady I bought it from.  She was asking $25 for this hope chest, which is a Lane.  But when I got to there to look at it in person it was in such horrible shape I wanted to drive away empty handed.  However I'm a sucker for a project like this one, so I offered her $20. She quickly, TOO quickly, agreed and then said, "Great.  I was just going to burn it anyway!" It is 30 years old and was stored in a garage way too long. One of her dogs had chewed up a couple of the corners, the base was completely crumbling because of water damage, there was white paint stained all over the front, the inside lock latch is missing and I think a small child might have practiced his knife skills on the edges.  However, the inside was in perfect condition (or close to). 

I have to just say now how much I love my Mark.  The end of this month we'll be celebrating our 32 wedding anniversary and I love him more and more every day!  Especially the day he helped unload this diamond in the rough!  No wonder we're married. He said, "Well, we can rebuild the base completely."   Did you get that? "We"?  I'm blessed, I know it!


Turns out even that part took WAY more time than even he imagined.  He used what was left of the old base as a pattern and cut and constructed a new base, as solid as ever.  He knew it had to be solid or the chest would just be a flimsy piece of furniture. It took him half a day but it's perfect!


So...back to the paint sprayer....  I've got one coat of paint on and hope to do a second coat this weekend.  I took off the fake drawer pulls to clean them up while I painted.  I had a brilliant idea to soak them in Acid Magic....overnight.  Oops.  Acid being the overnight operative word: not a good idea. They are no long usable so I'll find another set to replace those. 


I'll try to post the final picture later.
 
Back to Mother's Day:  We picked up 6 more blueberry plants from 101 Plants and Things down in Bandon on Highway 101.  It was the first time I've been there and was very impressed with the quality of their plants.  We'll go back for a few more blueberry plants soon. Our berry garden is doing great now, the raspberries are growing fast and the blueberry plants are doing much better after some ground work. (That "ground" work is when I hurt my foot but that story is too long to tell here!)  The old strawberry plants that have perpetually been growing now for 21 plus years, since my sister Roberta had a bunch sent to me as a  "Welcome to your new home" gift when we moved here.  They do need to be completely removed now as they barely bare any berries....... okay getting tired now!
 
More later, hopefully sooner than later!
        Blessings,
             ~Heidi
 
PS Thank you for all your sign orders!

Wednesday, April 3, 2013

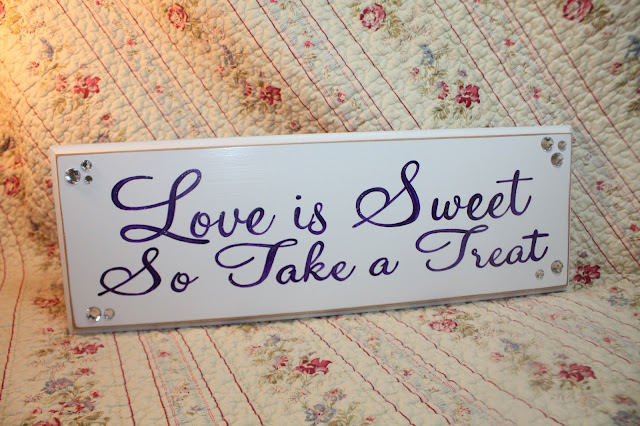
Love is Sweet with Rhinestones

Because I paint each and every sign order as the orders are placed, I am able to paint just about any color I'm asked for.  It's challenging to match up colors online, I must admit, as photographed colors often just are not true colors online.  But usually the wedding or event colors blend well, and that's what matters.
 
Once in a while a buyer will request a glitter glaze on the lettering, as shown in the following sign:

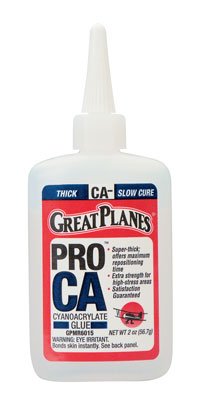
This buyer also request rhinestones!  I had never attached them to a sign before.  I wanted to make sure the rhinestones would not fall off (with cheap glue), nor could perhaps be picked off by some sweet little 3 year old child! I asked Mark (my husband) what glue he thought would be good.  He knew immediately that I should use what is called "PRO CA Cyanoacrylate Glue".  It's make by a company called "Great Planes".  You can order it through Amazon if you can't find it at a local store.  This glue is incredible.  But DO NOT let it get on your fingers, it adheres almost instantly and permanently.
 
This photo (from Amazon) shows "THICK", but the one I used was "MEDIUM".  They also have a "THIN". (You can click on the glue to get to Amazon.)

Just wanted to share a very good product.  Again, let's review what NOT to do with this glue---let it touch your skin!!!

 
My outdoor photography....but inside?  I have some lighting issues....
 
Advise, please?  I spend a lot of time painting, which leaves me little time to actually photograph my work.  I have lighting issues (obviously!) and wonder if anyone has some lighting tips? I take most of my photos at night and use every light available, but I'm not satisfied with the lighting.  Please don't suggest photographing during the day, as here in Oregon...well let's just say I could never be a "Natural Light" photographer!
 
Blessings,
~Heidi

Thursday, March 21, 2013

I Was Chalking Before Chalking Was Cool

You know the song, "I was Country, when Country wasn't cool.", right? Well that's how it is with the chalkboard.  I was chalking before chalking was cool!  Years ago I fabricated a dozen or so various picture frames into darling chalkboards. I painted the frames white and shabbied them up.  I replaced the glass and cardboard with thin plywood, which I painted with black chalkboard paint. I've used them through the years for various events, such as retreats, etc.

Now there's "chalk art" and so much more!  Our three grandkids have always loved to draw on the boards, which I then can put up on the wall as art!  I have a whole set of them in one of the guests room walls. 


Ellie loves to draw with chalk, if it's sharp chalk!


One of the best Pinterest finds I've ever come across was this one, the "sharpen your chalk".  The minute I saw it I had that "ah hah" moment! 


Sharpened chalk makes it so much easier to write on the chalkboards, or do "chalk art".  (Google that and you will be in awe of some of the things the chalk artist create!)  The kids love to use the sharp chalk.

John Mark, who is our local pencil sharpener (I kid you not, he lives to sharpen pencils!) spent his recent visit here sharpening all the chalk! He had a huge pile of shavings, but the chalk was sharp!


You do remember we have three grand kids....here's the third little one:


Always loads of fun when they visit!

Sharpen away, mates!
           Blessings, Heidi

Wednesday, March 20, 2013

Buzzing with Brides

My Etsy shop, Everyday Cookies Custom & Hand-painted Signs, has been buzzing with brides!  It's so fun when there's something *new* for the brides to use in their weddings.  I posted about it here.   The "ring bearer" is now the Sign Carrier!  He (or she) has a very important job now, to announce the bride!  The photo ops are fabulous now with the child carrying a sign.  Some of the brides are ordering the signs also for the little girls, their job went from "Flower Girl" to "Sign Girl".

All my signs are 100% hand made. I cut the wood, router the edges sand and sand some more.  Then I hand paint each and every sign to the specification of the order.

Here are just a few samples of the many I've been painting.  Most continue to ask for the signs painted in black on white, as it shows up best in photos. But I have painted some to match the bridesmaid dresses, etc.

Here comes the Bride!

Uncle Matt,
here comes
your Bride!

Uncle Jeremy,
here comes
your girl!
(I'll paint the lettering/words in any color, but black does show up best.)

Uncle Snay,
here comes
your girl!

Cousin Darrin,
here comes
your Bride!

Uncle Tony,
here comes
your girl!

Hey Roger,
here comes
your girl!
(Love that pop of PINK!)

Uncle Tomas,
Here comes
Your Bride.
(I paint exactly what you want, capital letter, punctuation, etc.
Please tell me exactly what you want when you order.)
 
You can use any words (bride, girl, etc.), any color, any punctuation. 
 I custom paint by order and it takes about two weeks.


And here's a cross we found on the beach Saturday:

(driftwood cross on the Oregon coast)
 
I love Palm Sunday, Passion Week, Good Friday and I'm all about Resurrection Sunday! It's the basis of my faith:  My Savior rose from the grave!  "He Lives"  (in my heart!).  I've put together a special Passion Week Bible study that I can email as an attachment if you ask. It's a daily study following Jesus the last week before He died on the cross.  (just ask!)
Blessings, Heidi

Thursday, January 17, 2013

Kraft Brown Paper and Paint Chip Sample Thank You Note Idea

The punch and glue dragonfly paint-chip sample card is at the end of this blog post...if you've come to my blog because of this photo (found on Instagram or Pinterest) I thank you for the visit!
~~~~~~~~~~~~~~~~~~~~~~~~~~~~~~~~~~~~~~~~~~~~~~~~~~~~~~~~~~~~~~~~~~~~~~~
I take vitamins daily, which worked in  my favor until the day after Christmas!  I caught a mean, lean, bug that parked me on the couch for a few days.  As I said, at least it was the DAY AFTER Christmas.  How to turn the proverbial lemons into lemonade? Make mine pink, please...


A couple things: The number one sweet deal was Netflix.  We have successfully stayed away from Netflix through the years.  But when you live out in the country and just need a movie, and you are sick, not able to drive to town to rent one (too much gas anyway!), Netflix starts to look pretty promising.  And throw in a month's free trial? 

I spent the next two days watching every episode of DC Cupcakes.  I have never watched the show on TV, I don't even know what channel it comes on or if we even receive it.  But I sure loved watching every show.  It was the perfect prescription for a sick girl, me!  The sisters interaction was fun to watch, as were all their creative cupcakes creations. 


The following Tuesday I was so excited when our daughter and family said they were coming over.  Someone to make cupcakes for---yippee!  I whipped up a batch of white chocolate cupcakes with white chocolate whipped icing.  To. Die. For.    I had been researching how to make yummy cupcakes using a store bought cake mix, and was successful. My mistake: I sent the ones we didn't eat back home with them, so that I wouldn't be tempted to eat them.  I was sick with the realization that I just made the best tasting cupcakes in my entire life and didn't keep any for us!   Oh well, Melissa and family enjoyed them. 


The second thing I did while sick was to put together a sort of craft box.  When I was in first grade I had whopping cough (yes, I really did, not a fun disease).  I missed about a month (or more) of school but my sweet mother was creative in keeping me busy.  I remember the Brand New Tablet she brought home one day.  The pages were multi-colored, so clean and new.  I may have had one pencil and a few crayons, but I was in heaven: a new tablet!    So when I'm sick on the couch for a few days I make up a "sick girl" box for myself, filling it with pretty paper scraps, glue and scissors.

 
With the paper scraps, stamps and pink paint chips (I use a lot of PINK in my sign painting business) I made "thank you" notes for all the lovely Christmas gifts I received. I used a dragonfly paper punch and punched a row of dragonflies (fly, flies?), gluing them onto fold brown Kraft paper scraps, cut to fit envelopes.  I used white stamping ink to stamp the "THANK YOU", as the white pops off the brown paper.  I called this my "Ombre Thank You Notes" and posted it to Instgram and Pinterest, attracting some attention!  Which is always fun. After this note tag was posted I had about a bajillion new followers to my Pinterest "Paper Love" board


The dragonfly punch is by Martha Stewart. It was a gift given to me by my sister a few years ago. I checked with her and she said she purchased it at Ross.  Since then I've checked and found this is a discontinued punch. But...there's always eBay!  You could use any design punch to get the same results.
 
Have a wonderful weekend. Blessings, Heidi